POV-Ray (write only)

The ray tracer program POV-Ray 3.x is for creating very high quality three dimensional, photo-realistic 24-bit images. By editing a POV-Ray input file and using its scene description language you can endlessly variate the colours, textures and lightning of the scene, and create professional images for example for www pages. Mol2Mol will generate a standard input file from the molecular coordinates in order to create images according to your wish. Camera and light positions are also calculated. To help the subsequent editing, and refining of the pov files most of the variables are declared at the beginning of the file, and optionally the description of the molecule itself can be placed in a separate include file.
Several options are available:
|
|

|
|
This first two options can be separately set for the whole image and a selected part of it. |

|
|
|

|
|
|

|
|
|

|
|
|

|
|
|

|
|
|

|
|
|

|
|
|

|

|

|
Buttons:
Edit *.pod file: Opens the file editor and loads the selected *.pod header file (see below).
Edit povcolor.dat: Opens the file editor and loads the POVCOLOR.DAT file (see below).
Create colours: Opens the Windows colour dialog window. You may choose or create a new colour. After closing the window the red, green and blue components of the selected colour will appear in the text window. These values can be used for modifying a *.pod file or a previously created *.pov POV-Ray input file.
Override colours: Opens the element colour window. On double-clicking on an element colour, this selected colour will override the atom colour defined in the POVCOLOR.DAT file. If you happen to create images from SHELX files and it contains Q atoms, the colour of lawrencium (the last element) will always be applied.
	Sky blue background with wood ground        // max two info lines before *header*
	*header*
	#version 3.1
	global_settings {assumed_gamma 1.4}
	#include "colors.inc"
	#include "textures.inc"
	#include "stones.inc"

	light_source { <-15,20,0> Red * 3      //!! if used in the *.pod file, Mol2Mol will not
	    spotlight                          //   calculate and add its own light_source object
	    radius  1
	    falloff 4
	    point_at -y
	}

	*footer*

	camera {angle 22}         //!! Mol2Mol calculates the basic camera positions, but
	                          //   you may modify them here
	plane {
	    <0,1,0>, %ymin%       //!!  %ymin% : Mol2mol variable, see later
	    texture {
	            T_Stone23 scale 3
	            }
	       }

	fog {
	   turbulence <.4, .2, .2>
	   color SkyBlue
	   distance 400
	    }
At the beginning there may be max. two lines of information, this will appear in the menu window. Everything between the markers *header* and *footer* will be added to the POV-Ray file before the description of the molecule. Everything after the marker *footer* will be added after the coordinates of the molecule.
Six special Mol2mol variables can be used in the *.pod files. They will be replaced by their actual numerical values during the generation of the POV-Ray file. The variables %xmax%, %xmin%, %ymax%, %ymin%, %zmax% and %zmin% designate the modified highest and lowest values of the x,y and z coordinates of the molecule. For example %ymin% is calculated as:
where ymin is the y coordinate of the "lowest" atom, and RVdW is van der Waals radius of this atom. These are very useful, if for example you want to place a plane under the molecule, as in the above example. The next scheme shows the definition of %xmin%, %ymin% and %zmin%:

Take into consideration that in Mol2Mol and POV-Ray the directions of the Z axes are opposite to each other! Mol2Mol takes this into account.
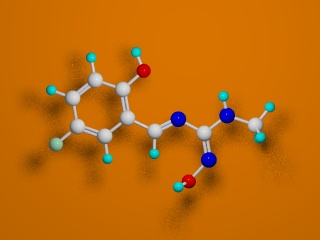
10 sample *.pod files will be installed together with the program; the corresponding sample *.jpg pictures can be found in the \others subdirectory. You can easily view these pictures with the Lview, ACDSee or any other graphical viewing program capable of using jpg files. For example the file sample9.pod produces the following type of image:
![]() Colour of the atoms and bonds in the POVCOLOR.DAT file:
Colour of the atoms and bonds in the POVCOLOR.DAT file:
Mol2Mol uses about 150 colours for colouring the different atoms and bonds. These are defined in the file POVCOLOR.DAT. You may edit this file in order to change the default colours, as written in the header of that file. You may use any of the colours already defined in POV-Ray: Bronze, Orange, Sienna and alike (consult the documentation of POV-Ray), or your own colours can be specified by the expression:
where the three values (red, green and blue components) should be in the range of 0.0 to 1.0. For convenience, use the Edit colors button to create a new colour. Alternatively, you can use the atom colours defined in the element colour window (Override color).
![]() The finishing of the surfaces can be influenced by changing the parameter of the Finish entry. The default is "Shiny", but you may use any predefined in the POV-Ray: "ambient", "Dull", "Phong .5" etc. Full expressions can also written, but only in one line, without line breaks:
The finishing of the surfaces can be influenced by changing the parameter of the Finish entry. The default is "Shiny", but you may use any predefined in the POV-Ray: "ambient", "Dull", "Phong .5" etc. Full expressions can also written, but only in one line, without line breaks:
You can edit the resulting files with in POV-Ray too. Most of the colour and atom size attributes, parameters are declared at the beginning of the generated pov file, so you can taylor them very quickly in the POV-ray editor too.